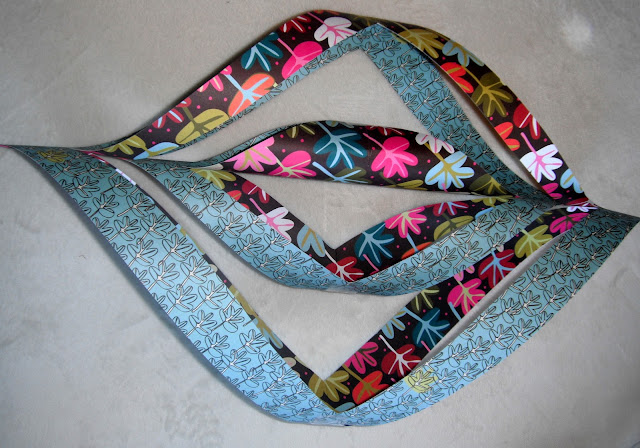
Decorate Paper Star Style...
you will need...
 |
| 6 pieces of square paper ruler scissors pencil ribbon stapler clear tape |
fold squares into triangles, corner to corner
measure in from both sides approximately 2.5", 5", 7"
cut 3 triangles...almost...
stop before you cut the full triangle
open triangles back to squares
squares, triangles, triangles, squares...yikes!
pull points together and tape
alternate directions
1/6th Done...
when all 6 points of the star are complete staple them together
big side to small side
staple the bottom tips together, and...
Voila!
WAIT, there's more...
After the star is put together, it's time to hang it...
I used a grommet, because I am that kind of girl...
however, poking a hole in one of the tips will do just fine
Lovely and Free!
Star light, star bright,
First star I see tonight,
I wish I may, I wish I might,
Have the wish I wish tonight.
First star I see tonight,
I wish I may, I wish I might,
Have the wish I wish tonight.


This is just gorgeous! wow! Thanks for the tutorial. This is going on my To Do list, for sure :-)
ReplyDeleteBest wishes!
i'm in LOVE with this. i sooooo want to do one. i love party type decor, this kind of reminds me of a whimsy celebration for SPRING!
ReplyDeletefound via myra's post at casabella.
i bookmarked this post.
HAPPY MARCH!
kellie
c est superbe
ReplyDeleteI just made this! It's so lovely. It's significantly bigger than I had imagined, so I'm trying to figure out how/where to hand it... my wreath hook will place it too low. Thank you so much for this beautiful idea! :)
ReplyDeleteThis is so pretty!
ReplyDeleteJo-Anna
Beautiful! So many possibilities, thanks for sharing!
ReplyDeleteThis is just beautiful!
ReplyDeleteLOOKS GREAT!! So impressive! I am visiting from Tatertots and Jello and I am a new follower!
ReplyDeleteHope you have a great weekend!
Michelle
www.delicateconstruction.blogspot.com
I LOVE this! I wanht to make one sooo bad. Where's my todo list? :) Thanks for sharing!
ReplyDeleteI've done thist with fabric and double sided fusible interfacing to make snowflakes for winter. It looks so complicated, but it's not! I never thought of doing it with paper!!
ReplyDeletewww.addicted2tutes.blogspot.com
Darling! Love! What a great idea for random scrapbooking paper...
ReplyDeleteThanks for linking to Creative Juice Thursday! I hope to see you back this week {party opens on Wed night @ 8pm CST}
Love, love your giant star! Great idea to use full sheets. Love the colors!
ReplyDelete~Amanda
Kelly, Thanks for the invite! Done!
ReplyDeleteSo cute thanks for sharing!
ReplyDeleteShelly
http://lovelishdesigns.blogspot.com/
I love this!! I'd love for you to link up at Wow Me Wednesday!
ReplyDeletehttp://polkadotsonparade.blogspot.com/2011/03/wow-me-wednesday-3.html
This is quite interesting, looks great. I saw you at Friday Flair by Whipper Berry. I would love to feature this on my blog. Will send you the link.
ReplyDeleteToday is my blog's first linky party. I would love for you to add this: http://koolbeenz-blog.blogspot.com/search/label/Funky%20Fresh%20Fridays.
April, I am all linked up. Thanks for having me!
ReplyDeleteI featured this post on my blog:
ReplyDeletehttp://koolbeenz-blog.blogspot.com/2011/04/featured-crafters-1-with-tutorials.html
this is just lovely!
ReplyDeleteI always wondered how these were made! so cool!
ReplyDeleteI'd love for you to link this up to my new link party, Your Whims Wednesday! http://mygirlishwhims.blogspot.com/2011/04/your-whims-wednesday-1.html
Am I missing something? Do are they double sided paper or 2 pieces glued together. First pic shows white background and then it's double sided. Obviously I'm not a big crafty person or I could figure it out. Advice? Thanks!
ReplyDeleteDear Kitchychicks, The paper star is made of double sided paper that I bought at Michaels. Some of the tutorial pics do not reflect the same paper because of some lost photos. Does that help? If you have more questions, feel free to email me...nikkilolson@gmail.com
ReplyDeleteThanks Nikki! I went to Hobby Lobby for the paper and when I got there was thinking...hmmm...that doesn't seem right. And of course I couldn't find double sided there. So, I will try Michaels instead! Can't wait! :) Thanks again!
ReplyDeleteSo, so cute! And I love the papers you chose. Great tutorial! Thanks for linking up with Lemon Tree Creations today!
ReplyDeleteI made a beautiful star for my dining room. Thank you for the instructions.
ReplyDeleteThanks for sharing! I love it!!! Gonna use Christmas paper for mine.
ReplyDeleteThank you for this great tutorial that I found through Pinterest and I am linking it on my blog:
ReplyDeletehttp://anounceofcreativity.blogspot.com/2011/12/burlap-buttercups-weekly-challenge-we.html
Thank you so much for the idear! i made it a few days ago you can watch my star here
ReplyDeletehttp://www.blog.windgefluester.net/unsere-neuen-moebel/
Thanks so much for the great idea and instructions! I really loved this so after I made a big one, I got a pack of smaller size paper (8" x 8") and made 3 with those. They looked great for the holidays.
ReplyDeleteTY so much for the instructions! SO cute! I can't wait to try it!
ReplyDeleteI tried this tutorial. Not very good. The star comes out gigantic and is too heavy for it's own weight, so it sags badly. Don't use a whole sheet of scrapbook paper. It is way too big. Cut the paper down by at least a quarter and figure out your own measurments. More detailed instructions on measurements would be nice. I can offer anyone who wants them,, more detail. Don't waste your time or money, unless you want a saggy disappointment.
ReplyDeleteI made a couple of these using old calendars, they turned out beautiful. Used 8" squares and marked each cut at 1" starting at center.
ReplyDeleteI never saw this, I liked it very much and i'm gonna try to do it, thanks for the idea, keep it up a thumbs up for you
ReplyDeleteI found this post via pinterest. It is gorgeous and your tutorial is excellent. I love paper crafting :)
ReplyDeleteI should have thanked you years ago for this great tutorial. I've made many of these in lots of different sizes/patterns & they've always come out very nicely. Just made another one tonight and was reminded of your site where I first saw these. Thank you so much!
ReplyDeleteThank you very much for the great image and tutorial. I love paper folding/cutting etc so I shall definitely be giving this a go.
ReplyDeleteSorry I have not thanked you sooner for this. At the end of 2012 I made these with my co-workers on Kandahar Airfield. We were assisting our Commander with his 30 wedding anniversary that he did via Skype with his wife. We all mail ordered tuxedo t-shirts, had a mock tail bar and myself and the Engineering Branch made about 20 of these in black and silver (grey) paper. Leave it to engineers to get technical and petty with the measurements, but in the end it all worked conveyor belt style and we got it done. The star was beautiful but the memory of me and those soldiers and civilians making these will stay with me the rest of my life. XOXO
ReplyDeleteI just went to Michaels for paper and asked for their double sided......crazy but they said they don't carry it. I see your post is a few years old.......any new place to buy double sided paper ? Thanks.
ReplyDelete